In today’s digital landscape, maintaining high availability and scalability for web applications is paramount. Azure Load Balancer is a crucial component in achieving this goal within the Microsoft Azure ecosystem. Let’s delve into what Azure Load Balancer is, how it works, and best practices for optimizing its performance.
What is Azure Load Balancer?
Azure Load Balancer is a Layer 4 (TCP, UDP) load balancer that distributes incoming network traffic across multiple virtual machines (VMs) or cloud services within an Azure virtual network. It plays a pivotal role in ensuring fault tolerance, high availability, and scalability by evenly distributing incoming traffic among healthy instances.
How Does Azure Load Balancer Work?
Azure Load Balancer operates by distributing incoming traffic across multiple backend VMs or instances based on defined load-balancing rules. These rules can be configured to use various algorithms, such as round-robin or least connections, to optimize traffic distribution. Additionally, Azure Load Balancer supports both inbound and outbound scenarios, making it versatile for various application architectures.
Problem Statement:
In the dynamic landscape of cloud computing, managing incoming network traffic efficiently poses a significant challenge. As application workloads grow and user demands fluctuate, a single server can easily become overwhelmed, leading to performance degradation and potential downtime. Without a robust solution in place, businesses risk losing customers and revenue due to poor user experiences.
Example:
Consider a scenario where a popular e-commerce website experiences a sudden surge in traffic during a holiday sale event. With a traditional server setup, the website struggles to handle the influx of incoming requests, resulting in slow page load times and transaction failures. As a result, frustrated users abandon their shopping carts and turn to competitors for a smoother experience.
Solution:
Azure Load Balancers offer a comprehensive solution to address the challenges of managing incoming network traffic in the Azure cloud environment. With a range of load balancer types available, including public and internal options, Azure provides flexibility to meet diverse workload requirements.
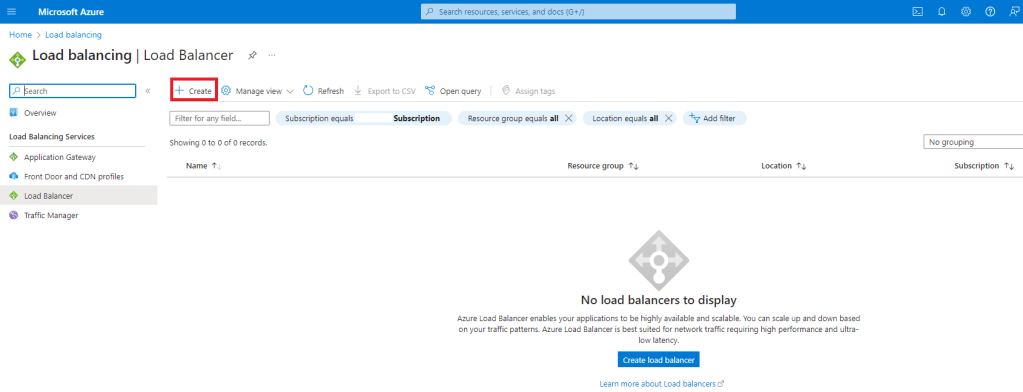
Creating a Load Balancer:
1. Sign in to Azure Portal:
Log in to the Azure Portal using your Azure account credentials at https://portal.azure.com/.

2. Navigate to Load Balancers:
Once logged in, search for “Load Balancer” in the search bar. Select “Load Balancer” from the search results.

3. Create a New Load Balancer:
Click on the “Create” button to start the process of creating a new load balancer.
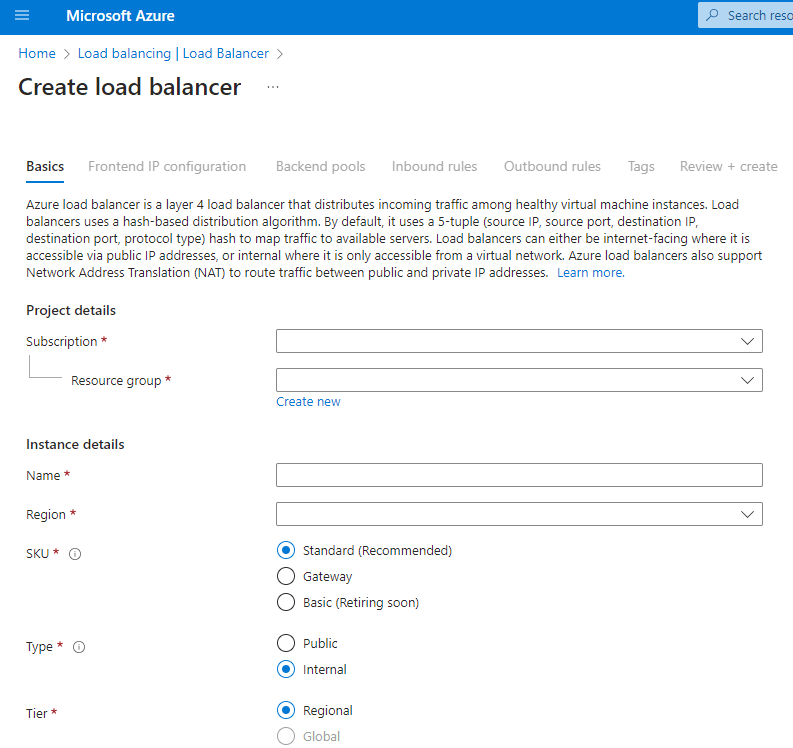
4. Basic Settings:
Fill out the basic settings for your load balancer, including:
– Subscription: Choose your Azure subscription.
– Resource Group: Create a new resource group or select an existing one where the load balancer will be deployed.
– Name: Provide a unique name for your load balancer.
– Region: Choose the Azure region where you want to deploy the load balancer.
– SKU: Select between Standard, Gateway or Basic
– Type: Select between Public and Internal (we will be creating Internal load balancer)
– Tier: Tier selection is limited to Regional for Internal load balancers
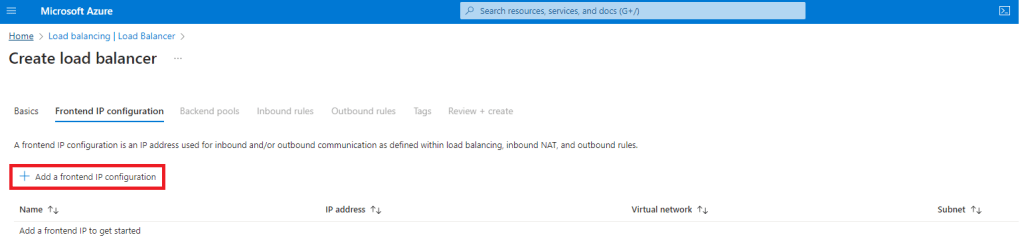
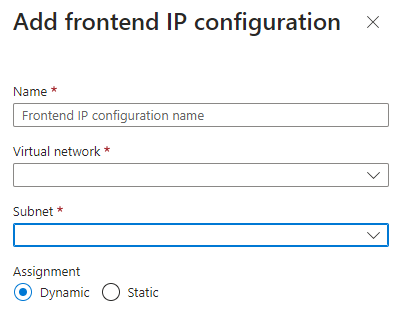
5. Frontend Configuration:
Configure the frontend IP address and port settings:
– Name: Provide a name for the frontend IP configuration.
– Virtual network: Select the virtual network where the load balancer will be deployed.
– Subnet: Choose the subnet within the virtual network for the load balancer.
– IP address assignment: Choose either “Static” or “Dynamic” IP address assignment.
6. Backend Pool Configuration:
Define the backend pool by specifying the backend IP pool or backend VMs/instances to which traffic will be distributed.
– Backend pool settings: Choose whether to create a new backend pool or use an existing one.
– Backend pool members: Add backend VMs/instances by specifying their IP addresses or selecting them from a list.


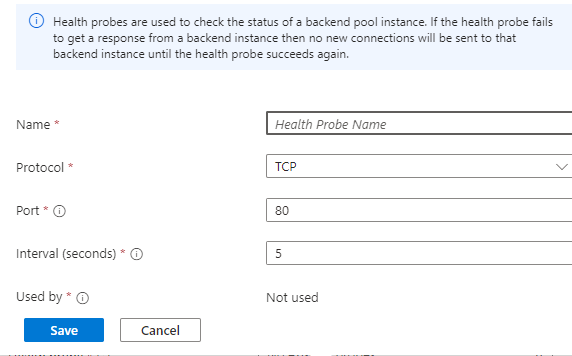
7. Health Probe Configuration:
Set up health probes to monitor the health of backend instances:
– Name: Provide a name for the health probe
– Protocol: Choose the protocol to use for health probes (e.g., HTTP, HTTPS, TCP).
– Port: Specify the port to use for health probes.
– Interval: Define the interval at which health probes are sent.
8. Load Balancing Rules:
Configure load balancing rules to define how incoming traffic should be distributed:
– Name: Provide a name for the load balancing rule.
– IP Version: Select IPv4 as the IP version.
– Frontend IP address: Select the frontend IP address for the rule.
– Backend pool: Select the backend pool to use for the rule.
– Protocol: Choose the protocol for the load balancing rule (e.g., TCP, UDP).
– Port: Specify the port number where load balancer will be used.
– Backend port: Specify the backend port to which traffic will be forwarded.
– Health probe: Select the health probe we created in previous step
– Idle timeout: Provide idle timeout for keep-alive messages


9. Review and Create:
Review all the configurations you have made for the load balancer. Once you are satisfied, click on the “Create” button to deploy the load balancer.
10. Deployment Progress:
Monitor the deployment progress in the Azure Portal. Once the deployment is complete, you will receive a notification, and the load balancer will be ready to use.
That’s it! You have successfully created an Azure Load Balancer. You can now start using it to distribute incoming traffic across your backend resources and improve the availability and scalability of your applications.
Key Features and Benefits:
1. High Availability: Azure Load Balancer automatically detects unhealthy instances and redirects traffic to healthy ones, ensuring continuous availability of your applications.
2. Scalability: By distributing traffic evenly across multiple instances, Azure Load Balancer allows your applications to scale horizontally, handling increased workloads effortlessly.
3. Security: With built-in DDoS protection and access control features, Azure Load Balancer helps safeguard your applications against malicious attacks and unauthorized access.
4. Flexible Traffic Routing: Azure Load Balancer supports multiple backend pools and custom routing rules, enabling you to route traffic based on criteria such as source IP address or protocol.
5. Integration with Azure Services: Seamlessly integrate Azure Load Balancer with other Azure services like Azure Virtual Machines, Azure Kubernetes Service (AKS), and Azure Virtual Machine Scale Sets for comprehensive load balancing solutions.
Best Practices for Optimizing Azure Load Balancer:
1. Properly Size Backend Pool: Ensure that your backend pool contains a sufficient number of healthy instances to handle expected traffic loads without overloading individual VMs.
2. Use Health Probes: Configure health probes to regularly monitor the health of backend instances and automatically remove unhealthy ones from the load-balanced pool.
3. Utilize Availability Sets: Deploy VM instances across multiple availability sets to distribute them across different fault domains and increase overall application resilience.
4. Implement Network Security Groups (NSGs): Apply NSGs to restrict inbound and outbound traffic to and from your backend instances, enhancing security posture and compliance.
5. Monitor Performance: Utilize Azure Monitor and Azure Log Analytics to monitor the performance and health of your Azure Load Balancer, enabling proactive optimization and troubleshooting.
Conclusion:
Azure Load Balancer is a critical component for ensuring high availability, scalability, and performance of your applications hosted on the Microsoft Azure platform. By understanding its features, benefits, and best practices, you can leverage Azure Load Balancer to optimize your cloud infrastructure and deliver seamless experiences to your users.
Author: Prabhat, is a seasoned IT professional, boasting over a decade of experience in the field of Operations and Infrastructure Support. His expertise spans across Azure Cloud and Windows on-prem platforms. A fervent enthusiast of Azure, he backs up his passion with a wealth of knowledge underlined by multiple Azure certifications.

Leave a comment