In today’s rapidly evolving digital landscape, efficient access management is crucial for organizations to maintain security and productivity. Azure Active Directory (AD) dynamic groups, now known as Microsoft Entra ID dynamic groups offers a powerful solution to streamline access control by automatically assigning users to groups based on predefined rules. This not only simplifies administrative tasks but also ensures that users have the appropriate level of access at all times, adapting to organizational changes seamlessly. In this blog, we will delve into the intricacies of Azure AD dynamic groups, exploring their benefits, implementation strategies, and best practices to empower organizations in optimizing their access management processes.
Problem Statement:
The current process of manually assigning users to Entra ID/ Azure Active Directory (AD) groups is extremely time-consuming and prone to errors, especially in large organizations with hundreds or even thousands of users. This process includes determining which groups a user should be a member of based on their role, their department, or the resources they need access to. Further complicating matters is when a user’s role changes, or when they join or leave a project team, as their group memberships may need to be updated.
Example: Real-life Scenario
The team manually assigns the roles during user on-boarding or whenever a user role changes. The process is described below:
1. Sign in to the Azure portal
Access the Azure portal at https://portal.azure.com/ with an account that has a Global administrator, Groups administrator, or User administrator role in the Azure AD organization.
2. Access the Entra ID/ Azure Active Directory Admin Center
On home page, under More Services go to Identity -> Microsoft Entra ID or search for Microsoft Entra ID on Azure search bar. This opens the Entra ID/ Azure AD overview page.
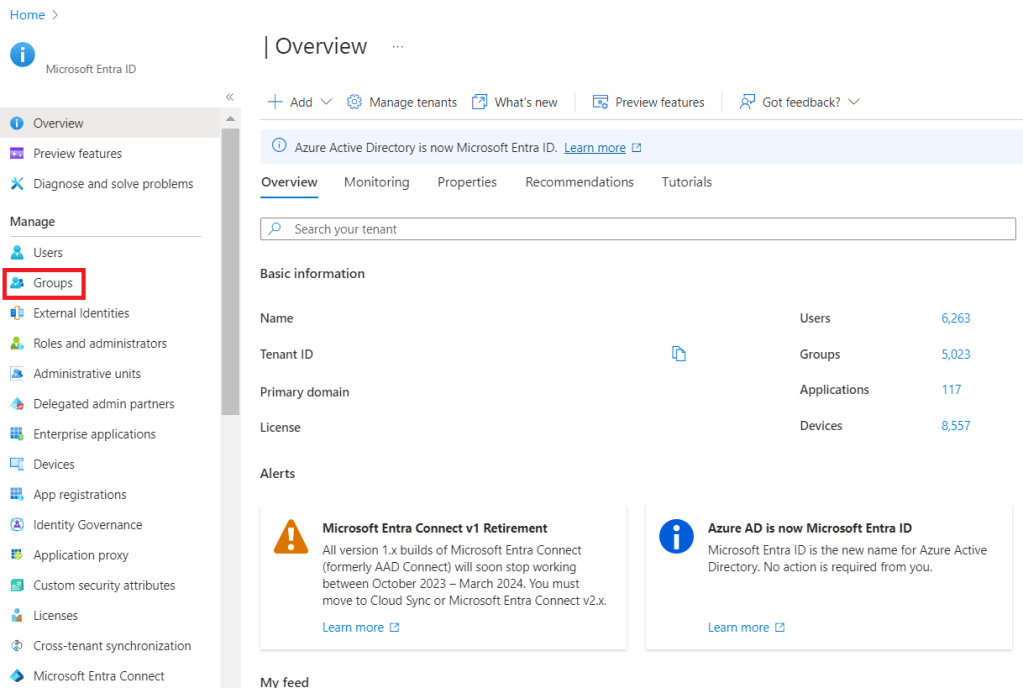
3. Access the Groups
From the Entra ID/ Azure AD overview page, you can select ‘Groups’ on the left-side navigation menu. Here, you can see the list of all the current Active Directory Groups.
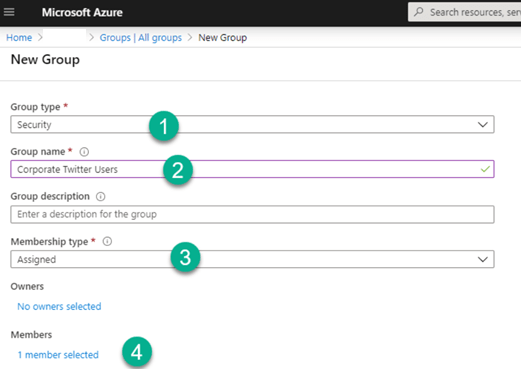
4. Select or Create a New Group
From the list of groups, select the group to which you want to add a user. If the group doesn’t exist, you can create a new one by clicking on ‘New group’. You’d have to fill in the details like the ‘Group type’, ‘Group name’, ‘Group description’, ‘Membership type’, and ‘Owners’. Then click on ‘Create’.
5. Find the Group and Open Group Profile
Whether you’ve selected an existing group or created a new one, go back to the Groups section and click on the group name. This will open the group profile.
6. Add Members
Inside the group profile, select ‘Members’ and click on the ‘Add members’ button. This button will allow you to add new users to the group. You can add one or multiple users at the same time.
7. Select User/s
In the new tab that pops up, you can directly type the name of the user or search them by typing in the ‘Select’ input field. Click on a user’s name to select them, and they will be added to the Selected Members’ List.
8. Click on Select Button
After you’ve selected the users you want to add, click the ‘Select’ button at the bottom of the screen. You will get back to the ‘Add members’ window confirming your selected user/s.
9. Click on Assign Button
Click on the ‘Assign’ button to add the selected users to the group. You can see the users/ members in the group under the ‘Members’ tab.
Relevance: Why we need to resolve or automate this
The manual adjustments increase administrative overhead, can frustrate users with unnecessary delays in accessing needed resources, and can result in security issues if a user is incorrectly assigned to a group that provides access to sensitive resources. Finding a more efficient and accurate method to manage Azure AD group assignments is crucial to reduce administrative burden, enhance user productivity, and maintain proper access controls.
Solution: Implement Azure AD Dynamic Groups
Azure Dynamic Groups are an Entra ID/ Azure Active Directory (AD) feature that enables you to create dynamic membership groups for AD security groups and Office 365 groups. Azure AD periodically evaluates users’ attributes and updates the group’s membership list, adding or removing users who meet or no longer meet the rule’s conditions.
Here are the steps to create Azure Dynamic Groups:
1. Sign in to the Azure portal as a Global administrator or a user with the necessary permissions.
2. On home page, click on “Microsoft Entra ID.” Check More Services -> Identity -> Microsoft Entra ID when Entra ID is not available on home page.

3. Under “Manage” in the sidebar, select “Groups.”

4. Click on “New group.” On the basics page, select a “Group type.” For example, Security or Office 365.
Security group -> a group within Azure to manage member and computer access to the resources for the group
Office 365 group -> O365 group provides access to a shared mailbox, calendar files, SharePoint, as well as other services that are available in O365.
5. Enter a “Group name” and “Group description” (optional).
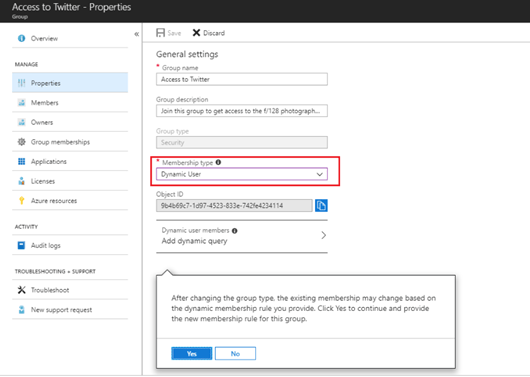
6. Set “Membership type” to “Dynamic User” or “Dynamic Device”, according to your needs.
7. After choosing the membership type, select “Add dynamic query.”
8. In the query builder UI, you can define the rules based on user or device attributes. You should enter your rule in the textbox or use the UI to build your rule. Click “Add expression” to add another condition to your rule. You can continue to add expressions until you are finished creating your rule.
9. Make sure you validate the rule syntax by clicking the “Validate” button, then click the “Save” button. Then click “Create”.
10. The group will be created, but it may take some time to populate members based on the rules created. You can view the members by navigating to “Groups” then selecting the group created.
Please note that with Azure AD dynamic groups, the membership updates for a dynamic group are performed by the Azure AD Group service when it runs a process, the process runs approximately every two minutes.
Best Practices:
Please ensure to do periodic maintenance to verify that your dynamic groups are working as expected. This maintenance includes validating the membership rules and performing tests to ensure that your dynamic groups are working effectively.
You should use test groups before deploying dynamic groups in your production environment. This approach will help you see the impact of your rules before you apply them to your production groups.
Author: Prabhat, is a seasoned IT professional, boasting over a decade of experience in the field of Operations and Infrastructure Support. His expertise spans across Azure Cloud and Windows on-prem platforms. A fervent enthusiast of Azure, he backs up his passion with a wealth of knowledge underlined by multiple Azure certifications.
#Azure # Entra ID #AAD #DynamicGroups #UserManagement #Security

Leave a comment